 MADE IN THE USA


Shaker Cabinet Door Replacement Tips and Tricks
Are you ready to give your kitchen a fresh new look? One of the easiest and most effective ways to upgrade your cabinets is by replacing the cabinet doors and drawer fronts with stylish Shaker designs. While there are many ways to replace cabinet doors, our method is guaranteed and tried and true by many customers. In this guide, we'll walk you through everything you need to know about measuring Shaker cabinet doors to ensure a seamless and professional-looking transformation.
Choosing Shaker Cabinet Doors
When selecting Shaker cabinet doors, it's essential to consider various materials to suit your kitchen's style, budget, and maintenance preferences. Alongside solid wood and MDF options, thermofoil presents another compelling choice worth exploring:
Solid Wood Options:

Renowned for their natural beauty and durability, solid wood Shaker cabinet doors offer a classic and timeless appeal. Materials like maple, cherry, or oak are favored for their distinct grain patterns and rich hues. Maple boasts a fine grain and uniform appearance, while cherry exudes warmth with its reddish tones and intricate patterns. Oak, with its prominent grain, adds a rustic charm to any kitchen. Solid wood doors are highly durable, and capable of withstanding years of use while offering the versatility of staining or finishing to complement your kitchen's aesthetic. Opt for CabinetNow’s Painted Wood option for a professional finishing process that are ready to install upon delivery.
- Finishing Options: CabinetNow provides a variety of finishing options to suit your project needs:
- Unfinished: Choose unfinished Shaker cabinet doors if you prefer to apply your own finish. These doors are sanded to a smooth 220 grit, ready for your personal touches.
- Painted: Opt for professionally painted Shaker cabinet doors that are fully finished and ready to install upon delivery. Our painted doors undergo a meticulous finishing process, ensuring a flawless and durable surface.
- Pre-primed: For added convenience, select white pre-primed Shaker cabinet doors that are primed and ready for painting. This option streamlines the painting process, saving you time and effort.
- Clear Coat Wood: Alternatively, choose clear coat wood Shaker doors for a natural and minimalist look. These doors are coated with a clear finish, enhancing the beauty of the wood grain while protecting against wear and tear.
To complete your kitchen renovation, CabinetNow offers the perfect complement to your Shaker cabinet doors: 5-piece Shaker drawer fronts or solid Shaker drawer fronts.

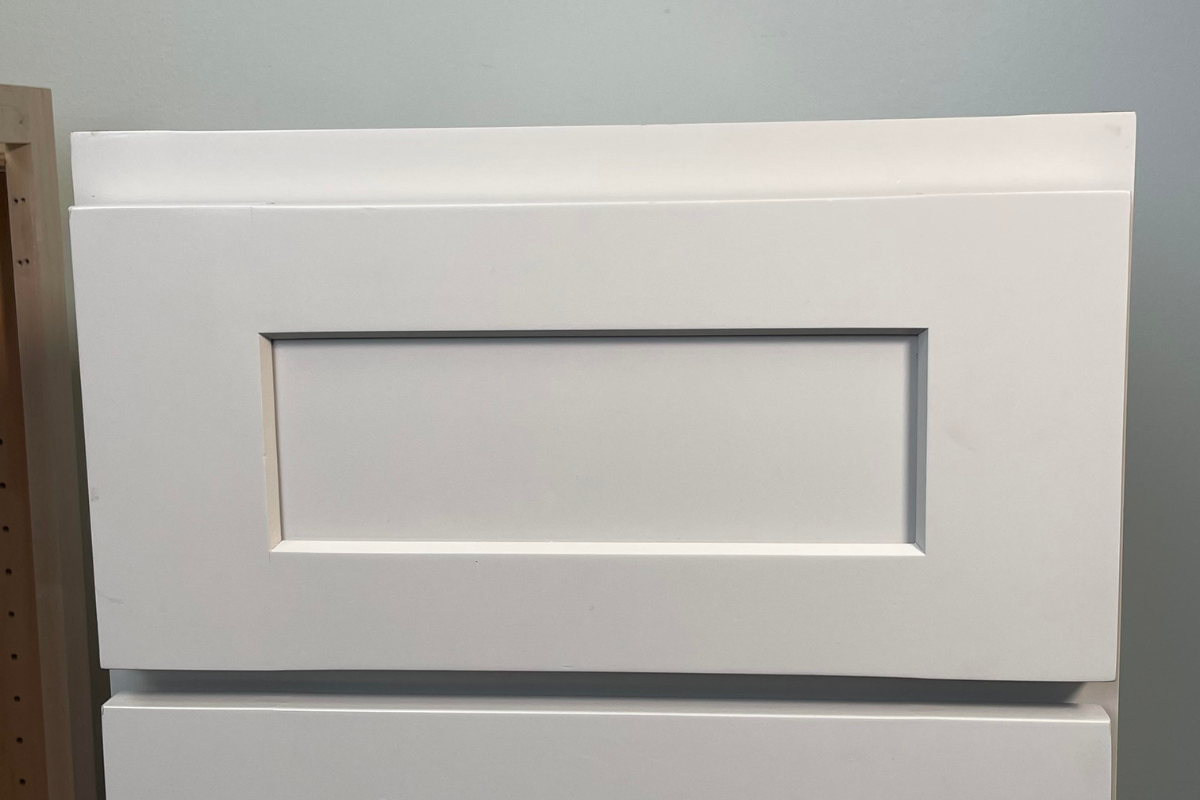
- 5-Piece Shaker Drawer Fronts: Designed to perfectly match your Shaker cabinet doors, our 5-piece Shaker drawer fronts feature the same timeless style and craftsmanship. Constructed with five individual pieces—stiles, rails, and a recessed panel—they offer a classic look that seamlessly integrates with your cabinet design. Available in all solid wood finishes, our 5-piece Shaker drawer fronts are customizable to suit your preferences and project requirements.
- Solid Shaker Drawer Fronts: For a cohesive and uniform appearance, opt for solid Shaker drawer fronts crafted from the same high-quality materials as your cabinet doors. These single-piece drawer fronts boast the same durability and aesthetic appeal as their cabinet door counterparts, ensuring a consistent look throughout your kitchen. Choose from a range of materials, finishes, and customization options to create drawer fronts that perfectly complement your cabinet doors and enhance the overall design of your space.
Thermofoil:

Thermofoil Shaker cabinet doors like our Modern Shaker Thermofoil Cabinet Door are crafted by applying a thin layer of vinyl film onto MDF or engineered wood, creating a seamless and uniform surface. Pair with the Modern Shaker Thermofoil Drawer Front to complete the set for a cohesive Shaker kitchen cabinet replacement look. This process results in a durable and moisture-resistant finish, making thermofoil doors ideal for kitchens prone to high humidity or moisture exposure. Thermofoil doors offer a wide range of colors and styles, mimicking the look of wood grain or other textures with precision. Additionally, they are easy to clean and maintain, requiring only mild soap and water for upkeep. With our Modern Thermofoil collection you can choose a variety of shaker styles including Shaker Slim Cabinet Doors. Pair with the corresponding drawer front, Modern Shaker Slim Drawer Front for a more sleek and modern look.
MDF (Medium Density Fiberboard):

Offering a budget-friendly alternative to solid wood, MDF Shaker cabinet doors like our Nashville MDF cabinet door are constructed from compressed wood fibers and resin. MDF provides a smooth and consistent surface ideal for painting, making it highly customizable to achieve your desired color or finish. Pair the Nasville MDF cabinet door with Nashville MDF Routed Drawer Front or Nashville MDF Solid Drawer Front for an affordable Shaker kitchen cabinet replacement. While MDF may not possess the natural beauty of solid wood, it offers practicality and versatility, with less susceptibility to warping or cracking. This makes it a low-maintenance option suitable for various kitchen styles and lifestyles.
Whether you opt for the natural elegance of solid wood, the versatility of MDF, or the durability of thermofoil, each material offers distinct advantages to suit your specific needs and preferences. By carefully considering factors such as aesthetics, durability, and maintenance requirements, you can select the perfect Shaker cabinet doors to elevate the style and functionality of your kitchen space.
Consider Bore Options for Shaker Cabinet Doors

When it comes to Shaker cabinet doors, customization opens up a world of possibilities to tailor your kitchen to your exact preferences and needs. Here's why considering bore options is essential:
- Highly Recommended Pre-Bored Doors: We highly recommend ordering Shaker cabinet doors pre-bored for European style hinges. These hinges offer a sleek and modern solution for cabinet installation, providing smooth operation and a clean aesthetic. By ordering pre-bored doors, you ensure that the hinge installation process is seamless and hassle-free.
- Choose Your Bore Pattern: Selecting the right bore pattern is crucial for proper hinge installation. At CabinetNow, we offer a variety of bore options specifically designed for European style hinges. These bore patterns are compatible with the hinges available at WoodWorkerExpress.com, ensuring a perfect fit for your Shaker cabinet doors.
- Expert Assistance Available: If you need help selecting the appropriate bore pattern for your Shaker cabinet doors, our team of experts is here to assist you. We understand that choosing the right bore options can be daunting, and we're dedicated to providing personalized guidance and recommendations to ensure a seamless customization process.
Please note that while we provide pre-bored holes for European style hinges, we do not sell hinges directly. We recommend visiting WoodWorkerExpress.com for a wide selection of high-quality hinges that are compatible with our bore options.
By considering bore options for your Shaker cabinet doors, you can streamline the installation process and ensure that your cabinets function smoothly and efficiently. With our expert assistance and compatibility with hinges from WoodWorkerExpress.com, CabinetNow makes it easy to customize your kitchen cabinets to your exact specifications.
Measuring Shaker Cabinet Doors

Before you embark on ordering your new Shaker cabinet doors, precise measurements are essential to ensure a perfect fit. Here's a step-by-step guide to measuring your cabinet openings accurately:
1. Prepare for Measurement: Arm yourself with a pencil and notepad. Remove your current cabinets to have your cabinet openings open and ready for measurement. *Note: If you want the same size as your existing cabinet doors, simply measure each cabinet door and drawer front size to the nearest 1/16”.
2. Measure Twice, Record Carefully: Measure each cabinet opening at least twice, noting down the width and height to the nearest 1/16". Record your measurements on your notepad, ensuring they are clearly labeled as width x height. For example, "width 14" x height 30"." Maintain a 1/8" clearance around all openings to accommodate the cabinet doors.
3. Precision is Key: Remember, your Shaker cabinet doors will be custom-made based on your measurements. Any inaccuracies could result in ill-fitting doors that are non-returnable. Double-check your measurements until you're confident they're perfect for your project.
4. Placing Your Order: Once you have your measurements, it's time to calculate the exact size of the cabinet doors you'll need and prepare to input them into the order form:
- Add 1 inch to Both Width and Height: To accommodate for a 1/2" overlay of cabinet door openings, add 1 inch to both the width and height of each opening size measurement. For instance, a 14" x 30" cabinet opening should be calculated as 15" x 31".
- Dealing with Split Door Openings: If you have split door openings, add 1" to the height, then add 1" to the width, divide by 2, and subtract 1/16". For example, for a 36" opening:
- 36" + 1" = 37"
- 37/2 = 18 1/2
- 18 1/2 - 1/16" = 18 7/16"
5. Consider Overlays: If your cabinet doors have overlays greater than or less than 1 inch, substitute that number into the calculations provided above.
6. Show Your Work: Keep careful records of your calculations on your notepad, underlining or highlighting the final sizes. Double or triple-check your work to ensure accuracy.
7. Input Your Custom Door Sizes: Carefully input your custom door sizes and quantities into the order form provided by CabinetNow. Proofread your entries to ensure they are error-free before submitting your order. Congratulations! You're now on your way to owning your perfect Shaker cabinet doors.
Installing Shaker Cabinet Doors

Transforming your kitchen with Shaker-style cabinet doors can elevate its aesthetic appeal and functionality. When it comes to installation, using European-style hinges offers a sleek and modern solution. Here's a step-by-step guide to help you seamlessly install your new Shaker cabinet doors with European-style hinges.
Before You Install: Measure Twice, Cut Once
Begin by ensuring accurate measurements of your cabinet openings. Measure twice to ensure precision, considering any desired overlays or spacing preferences. If you need assistance, please contact us via phone 1-855-669-5222 or email at info@cabinetnow.com.
Tools Required:
- Screwdriver
- European-style hinges
- Measuring tape
- Two-sided foam tape or clamps
- Wood Shims
Step 1: Attach European-style Hinges to Cabinet Doors
Start by attaching the European-style hinges to the prebored Shaker cabinet doors. Follow the manufacturer's instructions for proper installation, ensuring they are positioned correctly to allow for smooth opening and closing.
Step 2: Attach Hardware to Cabinet Doors

Once you've assembled your cabinet and prepared it for installation, the next step is attaching the hardware to the cabinet doors. This process is crucial for both functionality and aesthetics, as the hardware not only allows you to open and close the doors but also adds a decorative touch to your cabinets. Here's how to do it effectively:
- Gather Your Tools: Have hinges, knobs or handles, screws, a screwdriver or drill, and a measuring tape handy.
- Choose Complementary Hardware: Select hardware that matches your cabinet style.
- Measure and Mark: Determine hardware placement, typically 2 to 4 inches from the top or bottom edge, and mark for drilling.
- Drill Pilot Holes: Use a drill bit slightly smaller than the screw diameter to create pilot holes.
- Attach Hardware: Align hardware with pilot holes and secure with screws, avoiding overtightening.
- Test Functionality: Ensure smooth operation by opening and closing doors.
- Make Adjustments: Tighten screws or reposition hardware if needed for proper fit.
Following these steps ensures both functionality and aesthetic appeal for your cabinets.
Step 3: Position The Cabinet Doors
Once the hinges and hardware are attached to your Shaker cabinet doors, it's time to position them onto the cabinet frame. This step requires careful attention to detail to ensure that the doors hang straight and align properly when closed.
Begin by holding the door in place against the cabinet frame. Use a level to check that the door is straight vertically. Adjust the position of the door as needed until it is perfectly vertical.
Next, check the alignment of the door horizontally. Ensure that there is an even gap between the door and the cabinet frame on all sides. If necessary, adjust the position of the door using shims or by slightly loosening the hinge screws and shifting the door until it is properly aligned.
To hold the doors in place temporarily while making adjustments, you can use two-sided foam tape or clamps. Place the foam tape along the edges of the door where it will contact the cabinet frame, then press the door firmly into place. Alternatively, use clamps to hold the door securely while you make adjustments.
Taking the time to properly position and align your cabinet doors ensures not only a professional-looking finish but also ensures that your cabinets will function smoothly for years to come.
Step 4: Adjust Hinge Position
With the doors in place, adjust the position of the European-style hinges as needed to ensure proper alignment and clearance. This step is crucial for smooth operation and a professional finish.
Step 5: Secure Hinges to Cabinet Frame

Once satisfied with the alignment, secure the European-style hinges to the cabinet frame using screws. Ensure the hinges are firmly attached to provide stability and support for the cabinet doors.
Step 6: Check for Smooth Operation
After securing the hinges, test the cabinet doors to ensure they open and close smoothly without any interference. Make any necessary adjustments to the hinge position for optimal functionality.
Step 7: Double Check Alignment

Double-check the alignment of the cabinet doors to ensure they are level and evenly spaced. Use a level to verify alignment, adjusting as needed for a polished finish.
Enjoy Your New Cabinet Doors!
Congratulations on successfully installing your new Shaker cabinet doors with European-style hinges! With their sleek design and smooth operation, your kitchen has been transformed into a stylish and functional space. If you're ready to embark on your cabinet upgrade journey, our experts are here to assist you every step of the way, from measuring to ordering.
Installing New Shaker Drawer Fronts
Installing drawer fronts can be the most challenging part of any kitchen cabinet refacing project. You can buy the best premium cut plywood cabinet boxes and drawer boxes, but if you do not install your drawer fronts correctly you will end up with uneven spacing and crooked placements.
There are many ways to install new drawer fronts but CabinetNow has found the easiest way to ensure your drawers will turn out beautifully and you will get your money’s worth! We have curated these detailed steps and tips for installing your new drawer fronts.
Before You Install: Measure Twice, Cut Once
Before installation, you will need to take precise measurements for your drawer boxes, then you will be able to measure for your drawer fronts. Our motto is measure twice, cut once because once we have your exact measurements, our job is to cut them precisely and ship it directly to you. Once you have your drawer boxes measured out, then you will be able to measure for drawer fronts based on your desired overlay.
If you need assistance with measuring, please fill out our custom cabinetry request form to get connected with a designer who can help you with everything from measuring to ordering.
Tools required:
- Screwdriver
- Drill
- Level
- Measuring tape
- Two-sided foam tape or clamps
- Wood Shims
Step 1: Drill Pilot Holes For Screws In Drawer Box
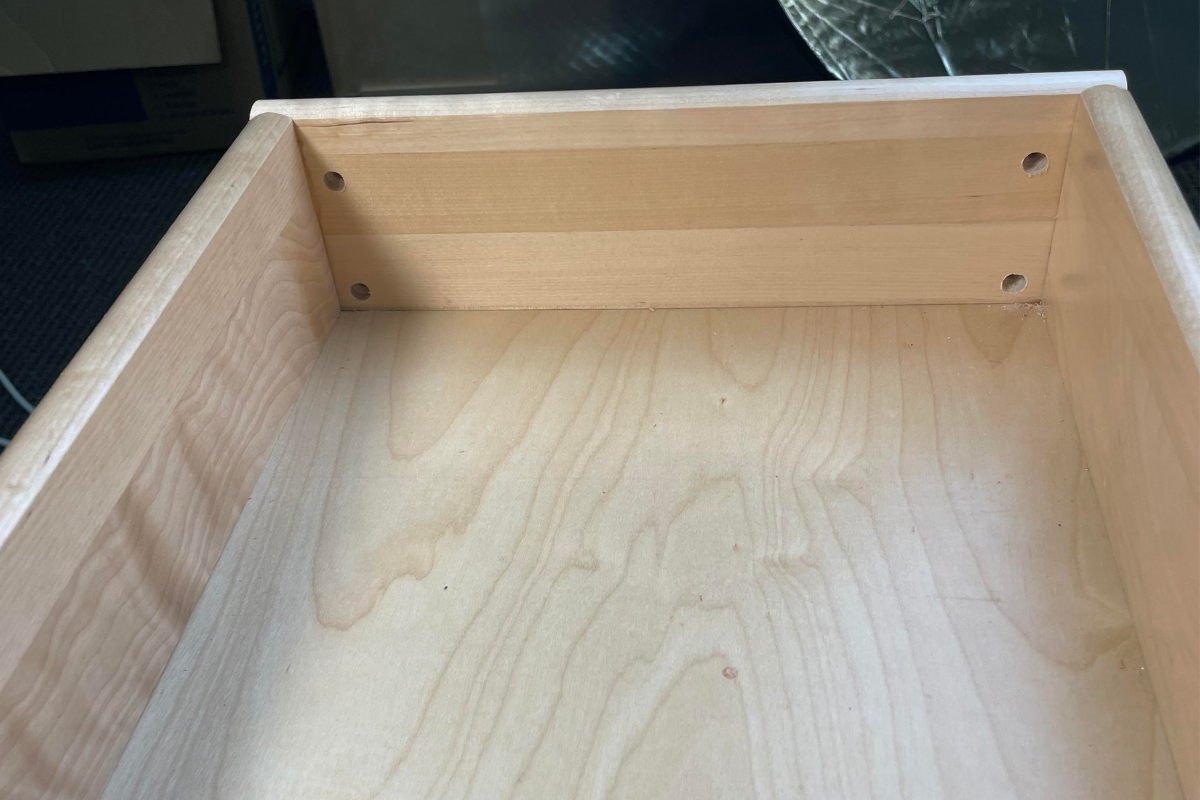
The first step is to predrill holes for your screws from the inside of the drawer box. You want to drill these holes on the outer edges of the drawer box face. For larger drawers, use two screws for each side of the drawer face.
Pro Tip:
If you are installing a shaker drawer front with a flat center panel, you may need to drill the pilot holes at an angle to ensure the screws bite into the rail of the drawer front and not the center panel.
Or you can use Kolbe Korners and special screws to make sure the drawer faces are secure. If you use Kolbe Korners and screws, no holes or screws will be drilled from the inside of the drawer box because these are mounting brackets that you will need to predrill through the holes of the brackets.


Step 2: Position The Drawer Front
You have two options for how to position your drawer fronts before you drill in the screws.

- Apply 2 sided foam tape to the face of the drawer box. Position the tape so that the rails of the drawer front stick to it. Press the drawer front firmly into position on the drawer box face. Ensure the drawer front is aligned exactly where you want it before applying pressure.

2. The second option is to use clamps to secure the drawer fronts, flush to the drawer box and tighten on both sides so it will not move before you start screwing.
Use a level to ensure the drawer fronts are even.
Step 3: Have Your Spacer Intact

Use at least a ⅛” spacer between each drawer front or cabinet door you are about to install. Allowing at least a ⅛” space between your drawers and cabinet doors will allow enough room to open and close your cabinets. Repeat the process for the rest of the drawer fronts making sure they stay aligned with both the cabinet door and drawer front below.

Door bumpers or wood fill strips are good options for spacers and are easy to remove when installation is complete. Repeat the process for the rest of the drawer fronts making sure they stay aligned with both the cabinet and drawer front below.
Pro Tip:
You can add more space depending on your desired overlay. Choose your spacer width depending on the desired amount of space you want between your cabinets in which you will already have decided because your desired overlay is factored into your drawer front size. The industry standard overlay is ½.”
Please consult with your designer if you are not sure what your overlay or spacing is to ensure you install your fronts correctly.
Step 4: Screw The Drawer Front Into Place
Carefully open the drawer box and drill the screw in from inside the box through the pilot hole and into the back of the drawer front applying pressure to the face of the drawer so that it doesn’t move.
As pictured, you can see I am drilling at an angle to ensure the screw goes into the rail of the shaker drawer front.
Step 5: Double Check

When finished, the drawers should be level and spaced evenly with a consistent gap between them. Use your spacers to ensure they are evenly spaced and a level to ensure they are evenly aligned. If needed, you can adjust using a screwdriver to tweak anything off.
Enjoy Your New Drawer Fronts!
Woohoo! Everything should be even and ready to go. If you are ready to start ordering new drawer fronts, contact our cabinet experts for help with everything from measuring to ordering.
Order Shaker Cabinets Today
With these expert tips and tricks, replacing your cabinet doors and drawer fronts with stylish Shaker designs has never been easier. Enjoy your newly transformed kitchen and the added charm and functionality it brings! If you need further assistance or guidance throughout the process, don't hesitate to reach out to our cabinet experts for personalized support.

