 made in the USA


Expert Tips for Hanging Wall Cabinets After Assembly
Hanging wall cabinets is a pivotal step in many DIY home improvement projects, providing both functionality and aesthetic appeal to any space. With the right tools and techniques, installing upper cabinets can be a straightforward process that enhances the organization and storage capabilities of your room. In this guide, we delve into expert tips for hanging wall cabinets after assembly, ensuring a sturdy and professional-looking result.
Tools Required:
Before diving into the installation process, gather the necessary tools and materials for the job.
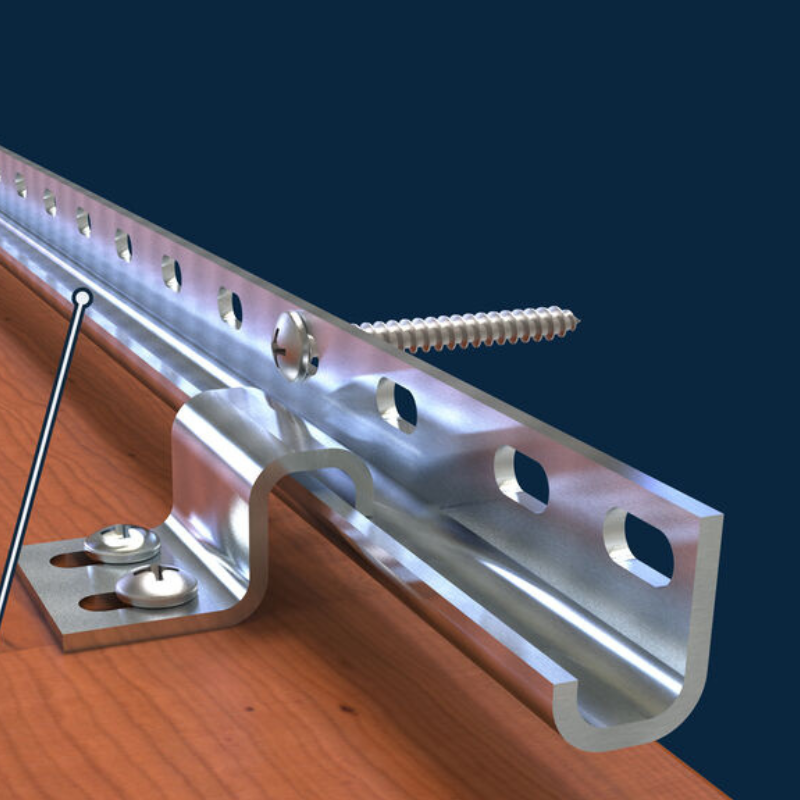
- Kreg Cabinet Installation System
- Level
- Stud Finder
- Drill
- Tape Measure
- Pencil

The Kreg Cabinet Installation System encompasses mounting brackets, studs, and wall cabinet bracket hooks, offering a comprehensive solution for mounting upper cabinets securely.
Step 1: Preparing the Workspace

Begin by preparing the workspace for cabinet installation. Clear the area where the wall cabinets will be mounted, ensuring there is ample space to work comfortably. Use a level to identify and mark the location of studs along the wall. Studs serve as the primary support for wall cabinets, so accurate placement is crucial for stability.
- Invest in a High-Quality Stud Finder: Opt for a stud finder with advanced features such as deep scanning capabilities and multiple detection modes. This ensures accurate identification of studs, minimizing the risk of errors during installation.
- Understand Wall Construction: Familiarize yourself with the typical layout of wall studs in your home. Studs are typically spaced either 16 or 24 inches apart, but this can vary depending on the age and construction of your property. Knowing this information helps you anticipate where studs are likely to be located.
- Use Multiple Verification Methods: While a stud finder is an invaluable tool, it's always wise to cross-reference its findings. Look for visual cues such as electrical outlets, light switches, or trim, as these are often installed adjacent to studs. Additionally, tapping lightly along the wall can help identify areas where the sound indicates the presence of a stud.
- Mark Stud Locations Clearly: Once you've identified the location of studs, use a pencil and a level to mark their positions accurately. Make vertical marks along the wall to indicate the center of each stud. This ensures that you have clear reference points for installing wall brackets and mounting cabinets.
- Check for Obstructions: Before drilling into the wall to install brackets, double-check for any obstructions such as pipes, wiring, or ductwork that may be hidden behind the drywall. Use a stud finder with a dedicated mode for detecting metal to identify potential obstacles and adjust your installation accordingly.
- Consider Wall Material: The type of wall material can affect stud detection and installation. Stud finders may perform differently on drywall, plaster, or paneling. Adjust the sensitivity of your stud finder as needed and be prepared to use alternative methods for marking stud locations if necessary.
- Take Your Time: Rushing through the process of locating and marking studs can lead to inaccuracies and complications during cabinet installation. Take your time to ensure that stud locations are identified correctly, as this lays the foundation for a sturdy and secure mounting of wall cabinets.
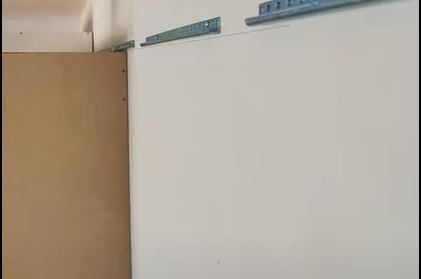
Step 2: Mount Your Brackets Onto the Wall
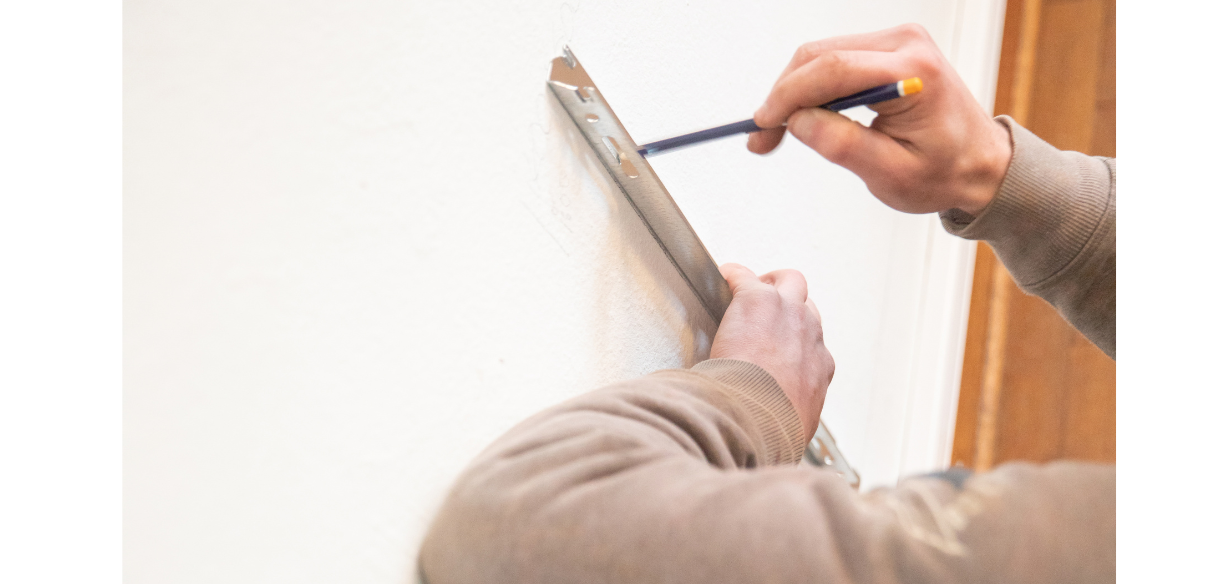
Once the studs are marked, proceed to install the wall brackets. Position the brackets along the wall so that each wall cabinet will be supported by at least two studs per wall cabinet. Use a drill to secure the brackets in place, ensuring they are level and properly aligned with the marked studs. The Kreg Cabinet Installation System simplifies this process, offering sturdy support for mounting upper cabinets.
- Double-Check Stud Placement: Before installing the brackets, reconfirm the location of the studs along the wall. Use a stud finder or alternative methods to verify their position and ensure accuracy. This step is crucial for proper support and stability of the cabinets.
- Optimize Bracket Placement: Position the brackets along the wall so that each cabinet will be supported by at least two studs per wall cabinet, as this provides optimal support and distributes the weight of the cabinets evenly. Avoid placing brackets directly over electrical outlets, switches, or other obstacles on the wall.
- Maintain Level Alignment: Use a level to ensure that the brackets are installed evenly and aligned horizontally. This prevents the cabinets from being tilted or skewed once they are mounted, resulting in a professional and visually appealing installation.
- Proper Drill Technique: When using a drill to secure the brackets in place, use the appropriate drill bit size for the mounting screws provided with the brackets. Drill pilot holes into the wall studs to prevent splitting or cracking of the wood. Use steady pressure and avoid over-tightening the screws to prevent damage to the brackets or wall.
- Utilize the Kreg Cabinet Installation System: Take advantage of the features offered by the Kreg Cabinet Installation System, such as pre-drilled holes and sturdy construction, to simplify the installation process. These systems are designed to provide reliable support and ensure a secure mounting of upper cabinets.
- Test Bracket Stability: After installing the brackets, perform a brief check to ensure that they are securely fastened to the wall and capable of supporting the weight of the cabinets. Gently apply pressure to the brackets to confirm their stability and adjust as needed before proceeding to hang the cabinets.
- Consider Weight Distribution: If installing multiple cabinets in a row, pay attention to the spacing and distribution of brackets to evenly support the weight of each cabinet. Adjust bracket placement as necessary to achieve balanced support and prevent sagging or uneven alignment of the cabinets.
Step 3: Adding Cabinet Brackets
With the wall brackets securely in place, it's time to add cabinet brackets to the top of the upper cabinets. These brackets will provide additional support and ensure a seamless installation.
Using a tape measure and pencil, carefully mark the desired location for each bracket on the cabinet. Be mindful of placement to ensure the brackets are concealed once the cabinets are hung.
- Measure Twice, Mark Once: Before marking the cabinet for bracket placement, take precise measurements using a tape measure. Double-check your measurements to ensure accuracy, as even small discrepancies can affect the alignment of the cabinets once they are hung.
- Consider Cabinet Dimensions: Take into account the dimensions and design of the wall cabinet when marking the location for each bracket. Position the brackets evenly along the top edge of the wall cabinet, ensuring that they are spaced appropriately to provide adequate support.
- Account for Overhang: If the wall cabinet has a decorative or functional overhang at the top, adjust the placement of the brackets accordingly. Position them slightly inward from the outer edge of the cabinet to ensure that they will be concealed once the cabinet is mounted on the wall.
- Use a Square for Alignment: To ensure that the brackets are positioned perpendicular to the cabinet edges, use a square or right-angle tool. Align the square along the edge of the cabinet and the surface where the bracket will be attached, then mark the location accurately with a pencil.
- Marking Techniques: When marking the cabinet for bracket placement, use a pencil to make small, discreet marks that are easily visible but can be easily erased or covered once the brackets are installed. Use light pressure to avoid damaging the cabinet finish.
- Test Fitment: Before drilling any holes, perform a test fitment of the brackets on the cabinet to ensure proper alignment and clearance. Adjust the position of the brackets as needed to achieve the desired placement and concealment.
- Visualize the Final Look: Step back and visualize how the cabinets will appear once they are hung on the wall. Ensure that the bracket placement enhances the overall aesthetics of the cabinets and complements the surrounding decor.
Step 4: Hanging the Cabinets
Once the cabinet brackets are installed, it's time to hang the cabinets onto the wall brackets. Lift the cabinet into position, ensuring it aligns with the wall brackets and studs. With the assistance of a partner, if necessary, carefully place the cabinet onto the wall brackets. Repeat this process for each upper cabinet, ensuring they are evenly spaced and level along the wall.
- Prepare the Work Area: Clear the surrounding area to provide ample space for maneuvering the cabinets into position. Remove any obstacles or debris that may impede the installation process.
- Check Alignment: Before lifting the cabinet, double-check the alignment of the wall brackets and studs to ensure they are properly positioned for mounting. Use a level to confirm that the brackets are aligned horizontally and evenly spaced along the wall.
- Ensure Proper Weight Distribution: If the cabinet is large or heavy, enlist the help of a partner to assist with lifting and positioning. This not only ensures safety but also helps to evenly distribute the weight of the cabinet during installation.
- Lift Carefully: When lifting the cabinet into position, use proper lifting techniques to avoid strain or injury. Lift with your legs, keeping your back straight, and use a steady, controlled motion to guide the cabinet onto the wall brackets.
- Align with Brackets and Studs: As you lift the cabinet, ensure that it aligns with the wall brackets and studs previously installed. Check that the brackets are securely seated within the designated slots or hooks on the back of the cabinet.
- Verify Spacing and Level: Once the cabinet is in place on the wall brackets, use a level to confirm that it is positioned evenly and level along the wall. Make any necessary adjustments to ensure that the cabinet is properly aligned before proceeding.
- Repeat for Multiple Cabinets: If installing multiple cabinets, repeat the process for each cabinet, ensuring they are evenly spaced and aligned with one another. Take care to maintain consistent spacing and level alignment throughout the installation process.
- Secure Cabinets in Place: Once all cabinets are hung on the wall brackets and properly aligned, use a drill to secure them into the wall studs. Drive screws through the designated holes in the back of the cabinets and into the studs to ensure a secure and stable installation.
Step 5: Securing the Cabinets
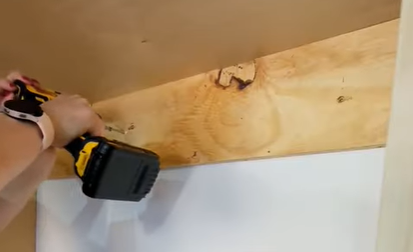
After hanging the cabinets onto the wall brackets, it's essential to secure them firmly in place. Use a drill to fasten the cabinets into the studs, ensuring they are securely anchored for stability. Pay close attention to the top and bottom of each cabinet, ensuring all attachment points are secure.
- Use the Right Tools: Select a drill with the appropriate drill bit size for the screws provided with the cabinets. This ensures a proper fit and prevents damage to the screws or cabinet material during installation.
- Pre-Drill Pilot Holes: Before driving screws into the studs, pre-drill pilot holes to guide the screws and prevent splitting or cracking of the wood. Use a drill bit slightly smaller than the diameter of the screws to create the pilot holes.
- Anchor Cabinets at Multiple Points: Pay close attention to the top and bottom of each cabinet, as well as along the back where it meets the wall. Drive screws through all designated attachment points to ensure the cabinets are securely anchored at multiple points for maximum stability.
- Follow Manufacturer's Instructions: Refer to the manufacturer's instructions for specific guidance on the recommended screw placement and spacing for securing the cabinets into the studs. Following these instructions ensures a proper and secure installation.
- Check for Level: Before fully securing the cabinets in place, double-check that they are level and properly aligned along the wall. Make any necessary adjustments to ensure the cabinets are straight and evenly spaced before driving the screws.
- Adjust as Needed: If any cabinets appear to be slightly out of alignment or not sitting flush against the wall, use shims or spacers to make minor adjustments as needed. This helps to ensure a tight fit and professional-looking finish.
- Inspect Attachment Points: After driving the screws into the studs, inspect each attachment point to ensure they are securely anchored and there are no signs of movement or instability. Tighten any screws as needed to ensure a snug fit.
- Test for Stability: Once all cabinets are securely anchored in place, gently test each one for stability by applying pressure to various points. The cabinets should feel solid and secure, with no noticeable wobbling or shifting.
Step 6: Adding Cabinet Doors
With the cabinets securely mounted, the final step is to add cabinet doors. Install hinges and handles according to the manufacturer's instructions, ensuring smooth operation and alignment. Take your time during this step to achieve a polished finish that enhances the overall appearance of the cabinets. Read our guide on how to install cabinet doors.
Conclusion
Mastering the art of hanging wall cabinets requires careful planning, precise execution, and the right tools for the job. By following these expert tips and utilizing the Kreg Cabinet Installation System, DIY enthusiasts can achieve professional-looking results that enhance the functionality and aesthetics of any space. Whether you're installing upper cabinets in the kitchen, bathroom, or garage, proper installation ensures durability and satisfaction for years to come.

