How to Paint Kitchen Cabinets - Prepare Like a Pro
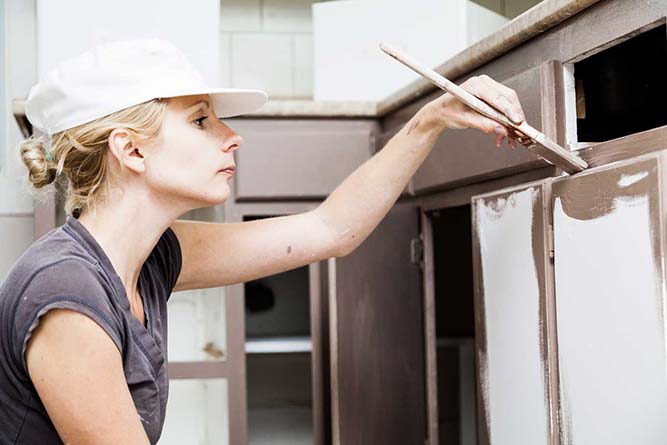
Painting kitchen cabinets can an affordable way to upgrade your kitchen on a budget. Many homeowners might not know how to paint kitchen cabinets, so we put together a guide to get you started. Purchasing new kitchen cabinets can cost you thousands of dollars and push homeowners to increase their remodel budget. But painting your cabinets can be a cost-effective way to makeover your kitchen cabinets that will only cost you a few hundred dollars
Whether a new color or a freshening up the same color, painting your kitchen cabinets can genuinely transform your kitchen and make it look as good as new. You can transform your cabinets' look and the feel of your kitchen with the right prep, primer, and cabinet paint. The first step is preparation. Here is a step-by-step guide to preparing to paint your kitchen cabinets.
Before You Start
There are a few things you need to consider before you start painting your kitchen cabinets, including the following:
- Budget: Repainting your kitchen cabinets will cost you less than $200. However, there may be additional costs if you have to purchase other things like new cabinet hardware, drawer and door runs.
- Use of Your Kitchen: Painting your kitchen cabinets will most likely make your entire kitchen unusable.
Materials You'll Need
You will need some supplies for prepping and painting your kitchen cabinets. Here is a quick shopping list for when you head to your local hardware store:
- Primer: Pick up an acrylic latex primer as it is high quality and will seal and fill in cracks.
- Roller: For the best result, you should get a four or six-inch foam roller. A foam roller will help you paint the sides of your cabinets and its face frames.
- Square Brush: The square end of a three to four-inch-wide brush will make easy work of painting the large, flat panels of your kitchen cabinets.
- Angled Brush: If your cabinet doors have a molding, a three-inch wide angled brush will help you get paint into the trickiest corners.
- Trisodium Phosphate (TSP): To remove any stubborn grease and dirt, you may need to purchase TSP. TSP is not an essential purchase but may be required during the cabinet cleaning process.
- Liquid Deglosser: Used before adding primer to remove the glossy layer that sandpaper usually does. It is a more straightforward solution than having to sand down your cabinetry manually.
- Painter’s Tape: Painter’s tape helps you clearly demarcate the painting area. It also prevents you from accidentally getting paint on whatever is around the surface you are painting.
Step-By-Step Guide To Prepare Your Kitchen Cabinets For Paint
Step One: Prepare The Room
Now that you've got all your supplies and materials, you can start preparing your kitchen for your paint job. Here are a few things you should do to your kitchen before picking up a paintbrush:
- Empty Your Cabinets: Remove everything from inside of your kitchen cabinets. Additionally, you need to clear off your countertops and remove any freestanding appliances.
- Protect Your Kitchen: Using rosin paper and masking tape, cover your countertops and flooring to protect it. Additionally, tape plastic sheeting over the windows, fixed appliances, backsplash, and interior doorways to protect the rest of the house from paint fumes and dust.
- Set Up A Workstation: You'll need to put the paint and other supplies on something, so why not set up a small work station in your kitchen - a simple trestle table will do.
Step Two: Remove Doors, Drawers & Shelves
To ensure that you do the best prep and paint job, you need to remove the doors, drawers, and shelves. Firstly, unscrew the hinges from your cabinet frames and remove the doors. Working from left to right and top to bottom, you need to label each one with a number on a piece of tape, so you know where it goes once painted. Additionally, number the edges of the cabinet shelves and bottoms of drawers. Remove and set aside any shelf-hanging hardware. At your workstation, remove the pulls and hinges and set them aside to be reused.
Step Three: Clean Your Cabinets
Once all the doors, drawers, shelves, hinges, and hardware are removed, you can now easily clean all surfaces of your kitchen cabinets. Using a cloth sprayed with degreaser and wipe all the cabinet surfaces with it to remove any oil. This is an essential step as it helps the primer to stick. If an ordinary household cleaner is not removing greasy areas, try using trisodium phosphate (TSP), which is sold at paint and hardware stores. TSP can be very aggressive, so follow the safety precautions on the container.
When cleaning your cabinets, clean all six surfaces of each drawer or cabinet door. Don't forget to clean the face frames and exposed sides of the boxes as these are often overlooked. Also, pay particular attention to cabinets surrounding or close to your stovetop, as they are more likely to be covered in grease.
Step Four: Prepare The Cabinet Boxes
Before you start this step, put on safety gear, and ensure that your kitchen has plenty of ventilation. To prepare the cabinet boxes for painting, you need to do the following:
- Degloss Your Cabinets: Use an abrasive pad and liquid deglosser and scrub down all the boxes surfaces. Try to avoid any dripping or use a rag to catch any excess deglosser. You'll need to work quickly as deglosser evaporates quickly, and you need to wipe away the residue with a clean, deglosser-dampened cloth.
- Fill Old Screw Holes: If you plan on relocating your kitchen cabinets' hardware, now is the time to fill the old screw holes with a wood filler. Mix only a small batch of filler at a time, as it typically sets within five minutes.
- Sand Surfaces: Using 100-grit sandpaper, sand down all surfaces of your cabinet boxes. This will cause plenty of dust, so you will need to vacuum your work area and inside the cabinet box afterward. Once cleaned, you can remove any access dust with a damp cloth.
Step Five: Prime The Cabinet Boxes
Starting at the top of each cabinet, add primer across the grain using your angled brush. Add a light second coat to ensure you've got all the nooks and crannies. Once applied, you'll need to give it a day to dry.
Step Six: Sand, Caulk & Fill
After 24 hours, you can do the following:
- Sand: You need to sand the flat surfaces of your cabinets with 220-grit sandpaper until the wood feels smooth.
- Caulk: For any open seams, squeeze a thin line of latex caulk into them. Pull the tip as you go, then smooth latex caulk with a damp cloth or finger.
- Fill: For any dents, scratches, or dings, fill them with vinyl spackle and smooth it with a putty knife.
Once the spackle is dry — which should take about an hour — sand again with 220-grit paper. You'll need to vacuum and wipe again with a damp cloth. You can now touch up any spots where the sandpaper has removed too much primer with a fast-drying primer. You'll need to wait another hour before lightly sanding the newly primed surface with a 280-grit paper. Do a final clean and vacuum before you can start painting.
Finishing Up
If you don't have the time, equipment, or experience to prepare your kitchen cabinets for painting, opt for pre-primed cabinet doors. From raised panel doors to arched cabinets doors, at CabinetNow, we offer various pre-primed cabinet doors for you to paint in whatever color you want. And if you don't want to paint these pre-primed cabinets, you can take advantage of one of our nine beautiful neutral colors. Either way, with a new color on your cabinets, your kitchen will feel like new!
If you are ready to start ordering or if you need assistance, please feel free to call us at 1-855-669-5222 or send us an email at info@cabinetnow.com. Our team of cabinet experts is here to help with everything from measuring to ordering.
 MADE IN THE USA


