 made in the USA

DIY or Hire a Pro? A Guide to Refacing Your Kitchen Cabinets
- Updating Cabinet Doors: The most noticeable change in cabinet refacing is replacing the cabinet doors. You can choose from a variety of styles, materials, and finishes to match your desired aesthetic. Whether you prefer sleek and contemporary or classic and traditional, there are options to suit every taste.
- Replacing Drawer Fronts: Like the cabinet doors, drawer fronts can be updated to coordinate with the new look of your cabinets. This involves removing the existing drawer fronts and installing new ones that complement the overall design scheme of your kitchen.
- Matching Cabinet Boxes: In cabinet refacing, you have the option to either apply veneer or paint the cabinet boxes to match the new look of your doors and drawer fronts. Rest assured, you don't need to stress over this step. When you work with a CabinetNow representative, they will expertly guide you through the process after filling out our Refacing form.
- Painting Cabinet Boxes: Painting offers a versatile and cost-effective way to update the cabinets, allowing for endless color options and customization. It covers any existing imperfections and provides a fresh and modern look to the kitchen.
- Resurfacing with Laminate Sheets: Resurfacing involves applying a new material, such as laminate sheets or veneer, to the surface of the existing cabinets and face frames, providing a fresh and uniform appearance. Both options can help update the appearance of the cabinet boxes to match the new doors and drawer fronts.
4. Updating Hardware: Swapping out old hardware, such as handles, knobs, and hinges, is another essential aspect of cabinet refacing. New hardware can instantly modernize the look of your cabinets and enhance their functionality. - Screwdriver
- Drill & Drill Bits
- Hinges with screws
- Finishing screws
- Paint Supplies/Laminate Cutter/Veneer Edge Trimmer
- Shims
- Level
- Remove the doors and drawers from each cabinet.
- Match the cabinet boxes to your new cabinet doors and drawer fronts.
- Hang the new cabinet doors using easy-to-install cup hinges.
- Attach the new drawer fronts to the existing drawers.
- Replace molding if necessary.
- Add new hardware to all cabinets.
- Measure each opening meticulously to the nearest 1/16".
- Drawer opening width
- Drawer opening height
- Door opening height
- Door opening width
- Record measurements diligently, noting the width followed by the height for each opening (e.g., "width 14" x 30" height").
- Leave at least 1/8" clearance around all openings to accommodate adjustments and ensure a proper fit. Use your wood shims to help achieve this.
- Once you have taken measurements of the cabinet openings, measure for you desired overlay, which determines how much the doors will extend beyond the cabinet opening when closed.
- Style: Select a style of cabinet door that complements your kitchen design, whether it's sleek and modern, classic and traditional, or rustic and farmhouse-inspired.
- Material: Choose from a range of materials such as wood, MDF, Thermofoil, or laminate. Each material offers unique characteristics and aesthetics.
- Bore Options for Hinges: Determine the type of hinges you'll be using for your cabinet doors and choose the appropriate bore options for a seamless installation. CabinetNow bores for European/Concealed hinges.
- Outside Edge Options: Customize the edge profile of your cabinet doors for added detail and visual appeal.
- Glass Panel Options: If desired, opt for cabinet doors with glass panels to add visual interest and showcase decorative items inside your cabinets.
- Finish: Explore different finishes such as painted or natural wood grain to achieve the desired look for your cabinets.
- Cabinet doors
- Drawer fronts
- Veneer/Laminate sheets for refacing or paint if you're painting your cabinet boxes to match.
- Empty the Cabinets: Remove all items from inside the cabinets to avoid damage and make it easier to work on the surfaces.
- Remove Doors and Drawer Fronts: Unscrew and remove the cabinet doors and drawer fronts carefully. Keep track of the hardware, such as hinges and knobs, for reinstallation later.
- Thoroughly Clean Surfaces: Use a rag dampened with denatured alcohol to clean all the face frames and end panels. This step removes grease, dirt, and other residues that can interfere with adhesion.
- Sand Surfaces: Use medium-grit sandpaper to scuff up all surfaces, including the face frames and end panels. This step ensures that the adhesive on the veneer and end panels bonds well with the cabinet surfaces. After sanding, remove any dust with denatured alcohol to create a clean, smooth surface for refacing.
- Installing End Panels: If you opt for end panels, attach them using construction adhesive and finishing nails. Ensure they are securely in place and properly aligned with the face frames.
- Preparing for Painting: If you decide to paint your cabinets instead, skip the end panel installation step. Instead, focus on preparing the cabinet surfaces for painting by cleaning them thoroughly and sanding them to create a smooth, paint-ready surface.
- Applying Veneer: Cut veneer strips to size using a laminate cutter or sharp razor knife. Apply the veneer to the cabinet face frames, ensuring a precise fit. Smooth and bond the veneer to achieve a seamless finish.
- Painting: If you're painting the cabinets, skip the veneer application step. Instead, apply primer to the prepared cabinet surfaces to promote paint adhesion. Once the primer is dry, apply multiple coats of paint, allowing each coat to dry completely before applying the next one. Sand lightly between coats for a smooth finish.
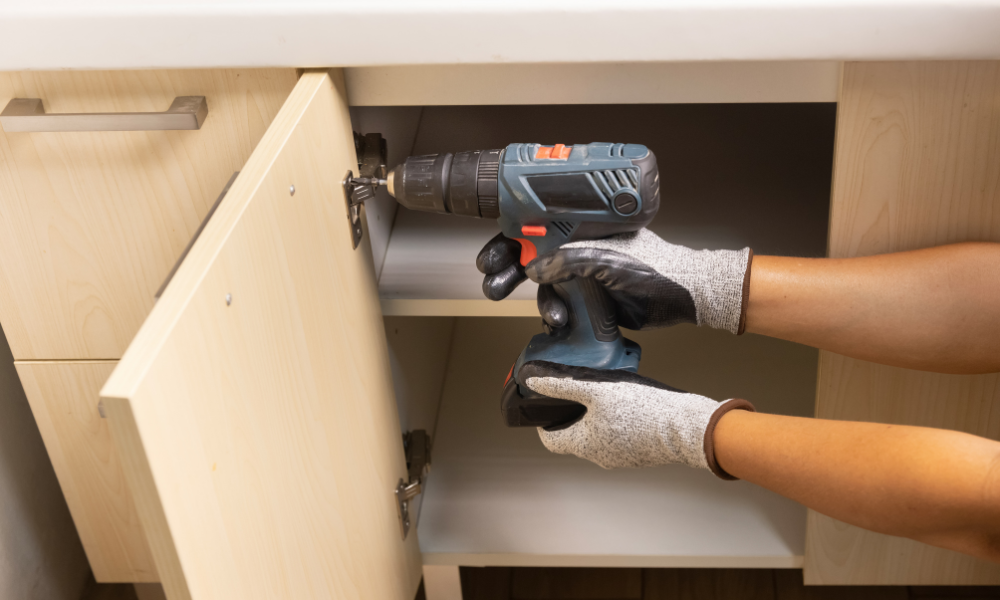
- Mount Cup Hinges: If your cabinet doors come pre-bored for hinges, simply attach the cup hinges to the designated holes on the doors. Ensure that the hinges are aligned correctly and securely fastened in place.
- Align and Hang Doors: Position the cabinet doors in their respective openings, ensuring proper alignment and overlay with the cabinet frames. The overlay refers to how much the door overlaps the cabinet opening. Use shims if needed to achieve a consistent gap between the doors and frames.
- Secure with Screws: Once the doors are properly aligned, secure them in place by screwing the hinges into the face frame or cabinet box. Start with the top hinge and then the bottom one, ensuring that the doors open and close smoothly.
- Test for Smooth Operation: After hanging the doors, test them to ensure they open and close smoothly without any binding or rubbing. Make any necessary adjustments to the hinges or door placement to achieve the desired fit.
- Drill pilot holes on the drawer box face.
- Consider angled holes for shaker fronts.
- Optionally use Kolbe Korners for no-drill attachment.
- Apply foam tape or use clamps for placement.
- Ensure alignment with a level.
- Use spacers like Wood Shims for consistent gaps.
- Adjust for desired overlay.
- Drill screws from inside the box.
- Apply pressure to prevent movement.
- Drill screws from inside the box.
- Apply pressure to prevent movement.
- Confirm level and spacing.
- Adjust as needed for a polished look.
- Precision and Accuracy: Professionals possess the expertise to execute each step with meticulous attention to detail, ensuring a flawless finish.
- Problem-Solving Abilities: Experienced handymen have the skills to overcome unexpected challenges efficiently, minimizing delays.
- Access to Tools and Resources: Professionals come equipped with specialized tools and industry connections, ensuring high-quality results and timely completion.
- Customization Options: Cabinet refacing offers numerous customization options, including door styles, materials, finishes, and hardware choices. Professionals have the expertise to guide homeowners through these options, ensuring they make informed decisions that align with their aesthetic preferences and functional needs.
- Measurement Precision: Accurate measurements are crucial for ordering materials and ensuring a perfect fit during installation. Professionals possess the skills to take precise measurements, accounting for nuances in cabinet dimensions and layout variations.
- Material Selection: Choosing the right materials for refacing, such as veneers, laminates, or solid wood, requires knowledge of their properties and suitability for specific kitchen environments. Professionals can recommend durable and visually appealing materials that withstand daily wear and tear.
- Installation Techniques: Installing cabinet doors, drawer fronts, veneers, and hardware requires proficiency in various carpentry techniques. Professionals employ best practices to achieve seamless installations, avoiding common pitfalls like misalignment, gaps, or structural weaknesses.
- Problem Resolution: Complex projects inevitably encounter unforeseen challenges, such as uneven surfaces, concealed damage, or incompatible hardware. Professionals leverage their problem-solving skills and experience to troubleshoot issues effectively, ensuring the project stays on track and meets quality standards.
- Location: The cost of hiring a professional for cabinet refacing can vary significantly depending on your geographical location. In areas with higher living costs or where skilled labor is in high demand, you can expect to pay more for professional services.
- Kitchen Size: The size of your kitchen is a major determinant of the overall cost of cabinet door refacing. Larger kitchens with more cabinets and drawers will require more materials and labor, resulting in higher costs compared to smaller kitchens.
- Scope of Work: The extent of the refacing project also influences the price. If you opt for extensive customization, such as intricate door designs, specialty finishes, or additional features like glass panels, the cost will likely be higher than a standard refacing job.
- Materials Used: The choice of materials significantly impacts the overall cost. Higher-end materials like painted hardwood will come at a premium compared to more affordable options like laminate or thermofoil finishes.
- Additional Services: Some professionals may offer additional services such as cabinet repairs, modifications, or organizational upgrades. These services can add to the total cost but may enhance the functionality and aesthetic appeal of your kitchen.
- Contractor Experience: Experienced contractors with a proven track record of quality workmanship may charge higher rates for their services. However, their expertise and attention to detail can often justify the investment by ensuring superior results and long-lasting satisfaction.
- Project Scope: Contracts clearly define the scope of the cabinet refacing project, detailing the specific tasks and services the professional will perform. This ensures that both parties have a clear understanding of what is expected, minimizing the potential for misunderstandings or disputes.
- Timeline: Contracts typically include a timeline or schedule outlining the project's duration from start to finish. This timeline may specify milestones or deadlines for completing various phases of the refacing process, helping to keep the project on track and ensuring timely completion.
- Payment Terms: The contract will detail the agreed-upon payment terms, including the total cost of the project, payment schedule, and accepted forms of payment. This provides transparency regarding financial obligations and helps prevent any payment-related issues or misunderstandings.
- Warranties: Contracts often include information about any warranties or guarantees provided by the professional, such as warranties on materials or workmanship. These warranties offer assurance to the homeowner that the work will be completed to a satisfactory standard and provide recourse in case of any defects or issues.
- Flexibility: It's important to note that contract terms may vary depending on the contractor and the specific details of the project. Some professionals may offer more flexible contract terms or be open to negotiation, while others may have standard contract templates with fixed terms.
- Kitchen Size: The size of the kitchen plays a significant role in determining the project duration. Larger kitchens with more cabinets and drawer fronts will naturally take longer to reface compared to smaller kitchens. The handyman will need more time to measure, prepare, and install materials in a larger space, extending the overall project timeline.
- Complexity: The complexity of the cabinet refacing project can also impact the duration. If there are intricate details, such as customizations, unique configurations, or additional work like installing new hardware or moldings, it may require more time to complete. Complex projects may involve more precise measurements, additional preparation, and meticulous attention to detail, all of which can extend the project timeline.
- Material Availability: The availability of materials can affect how quickly the project can be completed. If specific materials or custom components need to be ordered, the project may be delayed until those materials arrive. Delays in material delivery can prolong the overall project duration, especially if the professional is waiting for essential components to proceed with the refacing process.
- Handyman Schedule: The availability and schedule of the handyman or contractor performing the cabinet refacing work will also influence the project duration. Factors such as their workload, other ongoing projects, and any unforeseen circumstances may impact their ability to dedicate time to your project. It's essential to discuss and confirm the project timeline with the handyman before starting to ensure that it aligns with your expectations and schedule.
- Clear out cabinets and countertops: Remove all items from inside cabinets and drawers, as well as clearing off countertops to create ample workspace.
- Ensure unobstructed access: By clearing the kitchen space, homeowners allow the handyman to work more efficiently and minimize the risk of damage to personal belongings.
- Consider the layout: Identify any potential obstacles that may impede the handyman's ability to perform the work effectively, such as large appliances or furniture blocking access to cabinets.
- Create a safe work environment: Remove any hazards that could pose a safety risk during the refacing process, ensuring a smooth and efficient project.
Are you looking to revamp your kitchen without the hefty price tag of a full remodel? Refacing your kitchen cabinets might just be the solution you've been searching for. Not only is it a cost-effective option, but it's also a project that you can tackle yourself with the right guidance. In this comprehensive guide, we'll walk you through the step-by-step process of refacing your kitchen cabinets and help you decide whether to DIY or hire a professional.
What Does Refacing Your Cabinets Look Like?
Refacing cabinets involves updating the visible surfaces of your existing cabinets to give them a fresh and modern appearance. Instead of completely replacing the cabinets for a full kitchen remodel, which can be costly and time-consuming, refacing focuses on enhancing the aesthetic appeal of your kitchen while retaining the functional framework of the cabinets.

Why Reface Your Kitchen Cabinets?

Refacing cabinets offers a quick and easy makeover for your kitchen, breathing new life into the heart of your home. By simply updating the cabinet doors and drawer fronts you can achieve a fresh, modern look without the expense of a full renovation.
| Advantage | Description |
| Cost-Effectiveness | Refacing cabinets is significantly more affordable than a full renovation. You're only updating the visible elements, such as doors and drawer fronts which saves on material and labor costs. |
| Time Efficiency | Cabinet refacing is a much quicker process compared to a full remodel. With proper planning and preparation, you can transform your kitchen in a matter of days, minimizing disruption to your daily routine. |
| Minimal Disruption | Since the existing cabinet framework remains intact, there's minimal disruption to your kitchen layout and functionality. You can continue to use your kitchen throughout the refacing process with minimal inconvenience. |
| Environmental Sustainability | Refacing cabinets is an environmentally friendly option compared to replacing them entirely. By reusing existing cabinet frames and components, you reduce waste and minimize the environmental impact of your renovation project. |
| Customization Options | Refacing cabinets allows for a high level of customization and personalization. You can choose from a wide range of materials, colors, finishes, and hardware options to create a kitchen that reflects your unique style and preferences. |
| Increased Home Value | Updating your kitchen cabinets can significantly enhance the overall aesthetic appeal and perceived value of your home. A fresh and modern kitchen is a major selling point for potential buyers and can increase the resale value of your property. |
DIY Refacing: Is It Right for You?

Expanding on the DIY refacing process and its suitability involves considering several factors: skill level, time commitment, budget, risk tolerance, and available resources.
| Factors | Considerations |
| Skill Level | DIY refacing requires a certain level of skill and confidence. Experience in woodworking or home improvement is beneficial, but willingness to learn is crucial for beginners. |
| Time Commitment | Refacing cabinets demands meticulous planning and execution, consuming significant time and effort. Assess if you have the patience and dedication for each process step. |
| Budget | DIY refacing aims at cost savings by bypassing professional labor expenses. However, factor in material costs, tool investments, and potential unforeseen expenses when compared to hiring a pro. |
| Risk Tolerance | DIY projects carry inherent risks, especially for novices. Consider if you're comfortable facing challenges or setbacks along the way, and have contingency plans in place. |
| Available Resources | Evaluate your access to tools, workspace, and assistance. Ensure you have the necessary equipment and consider if you'll need help from others for certain tasks. |
Ultimately, the decision hinges on your circumstances and preferences. DIY refacing can be a fulfilling and economical option if you're ready to invest time, effort, and resources into learning and executing the process. Conversely, if you prefer expert handling or lack the required skills and resources, hiring a professional may yield the desired results with less stress.
How to DIY Reface Your Kitchen Cabinets
If you're a hands-on homeowner who enjoys DIY projects, embarking on cabinet refacing yourself could be an exciting endeavor. Here's a closer look at the step-by-step process, along with the essential tools you'll need:
Kitchen Cabinets Refacing Materials
Before diving into this DIY project, ensure you have the following tools handy:
Now, let's explore the steps involved in refacing your kitchen cabinets:
In A Nutshell
Refacing your kitchen cabinets involves these key steps:
Step 1: Measuring Your Cabinets
When measuring your cabinet openings for new cabinet doors, precision is paramount. Keep your pencil and notepad handy and follow these key bullet points to ensure accuracy:

Remember, your cabinet doors and drawer fronts will be custom-made based on these measurements, so accuracy is crucial. Double-check your work to avoid errors that could result in ill-fitting doors, which may not be returnable. Taking the time to measure accurately ensures that you order the perfect size cabinet doors for your refacing project.
Step 2: Ordering Your New Cabinet Doors & Drawers

After meticulously measuring your cabinet openings, it's time to order your new cabinet doors and drawer fronts. Here's how to proceed and customize your order to achieve the perfect look for your kitchen:
1. Customization Options: Consider the various customizations available for your cabinet doors and drawer fronts. These may include:
2. Matching Cabinet Boxes: To ensure a cohesive look, it's recommended to match your cabinet doors' color or finish to your existing cabinet boxes. Take your cabinet door to your local paint store, such as Sherwin Williams or Valspar, to find a close color match to paint your cabinet boxes. Alternatively, if you're ordering Thermofoil material, we offer laminate sheets that can be used to cover your cabinet boxes for a uniform appearance.
4. Ordering Process: Once you've finalized your customization options and matched your cabinet doors to your existing cabinetry, place your order for:
5. Explore Samples: If you're unsure about the color or material, consider ordering CabinetNow samples to see and feel the options firsthand. Our curated colors and wood grades are selected to be on-trend, decor-friendly, and stylish for your kitchen.
By carefully customizing your cabinet doors and drawer fronts and matching them to your existing cabinetry, you can achieve a cohesive and stylish look for your kitchen. Don't hesitate to explore the various options available and seek professional assistance if needed to ensure a successful refacing project.
Step 3: Prepare Your Cabinets
Before diving into the refacing process, it's essential to prepare your cabinets thoroughly. Follow these steps to ensure your cabinets are ready for the transformation:
Taking the time to properly prepare your cabinets ensures that the refacing materials adhere securely and results in a professional-looking finish. By emptying the cabinets, removing doors and drawer fronts, cleaning, and sanding surfaces, you set the stage for a successful refacing project that will breathe new life into your kitchen.
Step 4: Install End Panels or Prepare for Painting
Depending on your chosen method, you can either install plywood end panels or prepare the cabinet surfaces for painting:
Step 5: Cutting & Applying Veneer or Painting
Next, proceed with either applying veneer or painting the cabinet surfaces:
By offering these versatile steps, you can adapt the refacing process to suit your preferred method, whether it's installing end panels and applying veneer or preparing for painting. This flexibility allows you to achieve your desired kitchen transformation with ease and efficiency.
Step 6: Hang The New Cabinet Doors

Once you have your new cabinet doors ready, it's time to hang them. Here's how to do it:
By following these steps, you can effectively hang your new cabinet doors with ease and precision. Whether you're adding hinges to pre-bored doors or installing them yourself, proper alignment and secure attachment are essential for a functional and visually appealing result.
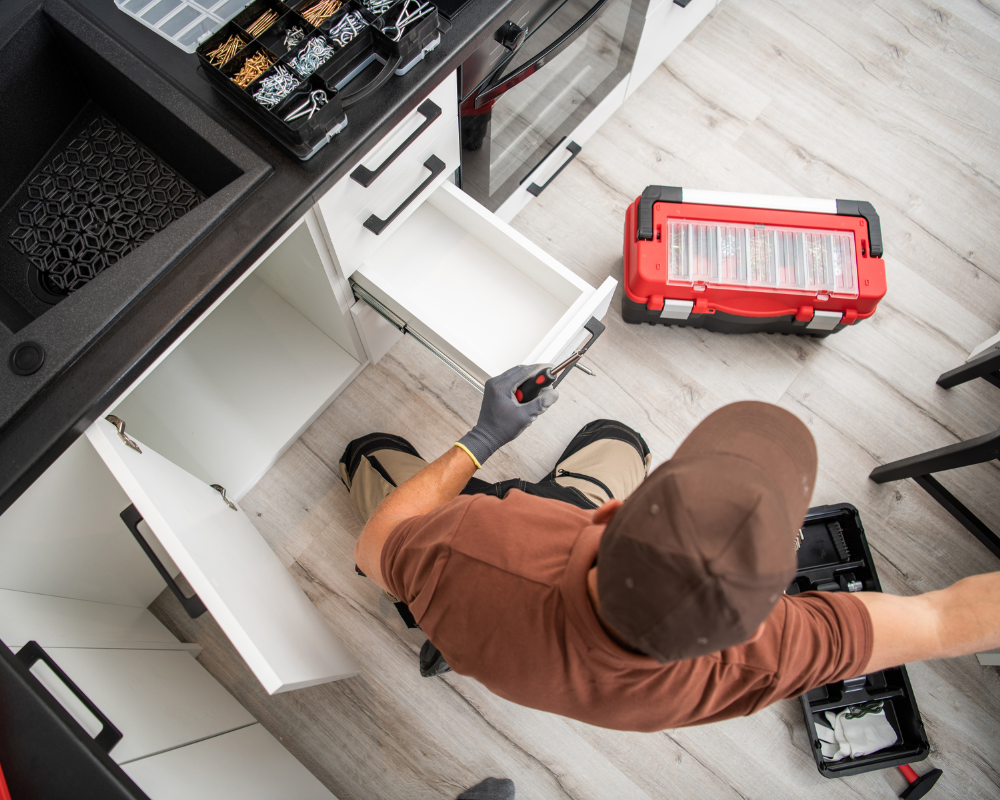
Step 7: Adding The Drawer Fronts

Measure and attach new drawer fronts, ensuring they are correctly positioned and aligned. Secure them with screws. Read this in-depth guide for How to Install New Drawer Fronts.
1. Prep Drawer Box:
2. Position Front:
3. Maintain Spacing:
4. Secure Front:
5. Check Alignment:
Completing these steps will give your kitchen cabinets a fresh, updated look. For a polished finish, replace any necessary molding and add new hardware. With the right tools and attention to detail, DIY cabinet refacing can be a fulfilling project that breathes new life into your kitchen space.
Cost Savings Comparison: DIY vs. Hiring a Pro for Refacing Cabinets
| Expense | DIY | Professional |
| Materials | $700-$2000 | $2000-$4000 |
| Tools | $100-$200 | $300-$500 |
| Labor | $0 | $500-$1500 |
| Total Cost | $800-$2200 | $2800-$6000 |
| Savings (%) | 50% | - |
This comparison provides estimated cost ranges for both DIY cabinet refacing and hiring a professional. DIY typically incurs lower material costs but involves no labor expenses, resulting in potential savings of around 50%. Hiring a professional, on the other hand, involves higher material and labor costs but may yield more consistent and efficient results.
When to Consider Hiring a Professional
While the DIY route offers a sense of empowerment and potential cost savings, there are situations where enlisting the expertise of a professional becomes the more practical choice. In this segment, we'll delve into the various scenarios where hiring a professional handyman or contractor can offer distinct advantages, from saving time and ensuring quality results to navigating complex customization options. Whether you're faced with time constraints, lack the necessary skills, or simply prefer the peace of mind that comes with professional assistance, this guide will provide valuable insights to help you make an informed decision. Let's explore the benefits of hiring a pro for your cabinet refacing journey.
Time and Expertise
If you're short on time or lack the necessary skills, a professional's expertise can ensure efficient and high-quality results. A professional handyman can expedite the refacing process, completing the project much faster than DIY attempts.
Typically, a professional handyman can reface kitchen cabinets within a timeframe ranging from two to five days. Factors such as project size, customization, and existing cabinetry condition influence the duration. Entrusting the task to a skilled professional guarantees efficient and impeccable results.
Guaranteed Results
Professionals offer assurance that the project will meet your expectations, especially important for complex tasks or specific aesthetic preferences.
Custom Cabinet Complexity
Cabinet refacing involves intricate details, from measurements to installation, where professionals excel in managing every aspect seamlessly.

Cost Considerations
Price Range
Hiring a professional typically costs between $500 to $1,500, depending on factors like location, kitchen size, scope of work, and materials used.

Overall, while the price range for hiring a professional for cabinet refacing may seem broad, it reflects the various factors that contribute to the overall cost. By carefully considering your budget, priorities, and desired outcomes, you can make an informed decision about the level of investment that best suits your needs.
Finding Professionals
Websites like TaskRabbit or Thumbtack provide a platform to find reputable handymen or contractors, offering reviews and ratings to aid in decision-making.
Hiring a Professional Process Overview
Contract Signing

Contracts outline project details, including scope of work, timeline, payment terms, and warranties, providing clarity and protection for both parties.
Project Duration
Projects usually take 2 to 5 days, varying based on kitchen size, complexity, and material availability.
Preparing the Kitchen to Hire a Professional
Clear out cabinets and countertops before the professional begins work to provide unobstructed access to the areas needing refacing.
Material Ordering

When it comes to material ordering for your cabinet refacing project, it's crucial to clarify who will be responsible for this task to prevent any misunderstandings. Some professionals may offer to handle the procurement of materials themselves, ensuring that everything is sourced correctly and according to your specifications. This can be particularly convenient if you're unsure about which materials to choose or if you prefer to have the process taken care of by an expert.
On the other hand, there are instances where you may be required to purchase the materials independently based on the professional's recommendations or specific project requirements. In such cases, it's essential to discuss the details with the handyman beforehand to ensure that you understand what is expected of you and to avoid any delays or complications during the project.
By clarifying the material ordering process upfront, you can streamline the project workflow and ensure that all necessary components are readily available when the work begins. This proactive approach helps prevent potential hiccups and ensures a smoother and more efficient cabinet refacing experience overall.
DIY or Hire a Pro for Cabinet Refacing?
In conclusion, deciding between a DIY approach and hiring a professional for your cabinet refacing project ultimately boils down to your individual circumstances, skills, and preferences. While DIY offers a sense of accomplishment and potential cost savings, it requires time, effort, and a certain level of expertise. Conversely, hiring a professional ensures efficient, high-quality results, particularly for those lacking the necessary skills or facing time constraints. By carefully weighing the pros and cons of each option, homeowners can make the best choice for their needs. If you're ready to transform your kitchen but unsure where to start, our dedicated representatives are here to help. Simply fill out our Free Quote for Refacing Cabinets form to get connected and kickstart your cabinetry refacing journey with confidence.

